Skip to content

Setup

Japanese Learning Setup

This section is concerned with setting up the various tools we will use to learn Japanese. The most important of which are Anki and Yomichan. This section is divided in three subsections: Anki, Yomichan and Mining. The names should be self-explanatory if you've read the main guide.

I use EndeavourOS (an Arch derivative) and Windows 10 in a dualboot setup. I do most everything Anki-related on EndeavourOS and most mining on Windows 10. This setup hasn't been tested elsewhere. If you want to mine visual novels on Linux I suggest looking at this page.


Anki setup

The first tool we are going to set up is Anki. But first, what exactly is Anki?

Anki, a spaced-repetition system

The idea behind Anki is probably older than the Internet itself. A very popular method to memorize anything is to use physical flashcards. You take a piece of paper, write a question, or more generally a prompt in the front of the card and you write the answer on the back of the card. Put simply, Anki is a virtual library of flashcard decks. It can be used to learn just about anything that requires memorization, 暗記 anki being the Japanese term for memorization. This is not only useful to language learners but also to geography enthusiasts and med school students.

Unfortunately, vanilla Anki (i.e. Anki without additional plugins or a specialized setup) suffers from a few issues. Those issues are very well documented and you should read this article to see what they are. My favorite Anki setups are this one and that one. In the following, I will try to summarize things for people who don't want to have to read through various guides and want a simple mining setup in the vein of the second guide above, with a few different additions of my own. I do not claim any originality in this setup, it is simply an amalgamation of various resources I have used to create my own setup that I like. With that being said, let's get on with it. This guide is made from the perspective of a Windows user. I have no idea how MacOS works and I cannot help with it. I also use Linux (more specifically EndeavourOS, an Arch-based distro) but I do most of my reviews in Windows on my dualboot setup. Hopefully the guide is still useful to you if you're not using a similar setup!

Installing Anki

To install Anki on Windows, head to the Anki homepage and click on the blue download button. If you're on Linux, your distribution should have an Anki package.

Follow the instructions for your system and make sure you are getting the latest version. There are two possible options to download Anki: qt5 and qt6. Get the qt6 version, it's better and the add-ons we are using are compatible.

Changing your settings

The last thing to do before we can use Anki to review our cards is to change the vanilla settings. You can find my preferences settings detailed here. To access this menu, go to the Tools tab and then Preferences.

The second part of the settings is the deck settings, which you can use on either Core 2k or your mining deck, depending on if you've finished Core/Tango already. You can find the deck settings here. An explanation of why we add a learning step (which is the main difference with vanilla Anki) can be found here along with other interesting points on why we set up Anki the way we do.

Installing fonts

I highly suggest you find a set of Japanese fonts that you really like. I personally use the Noto Japanese family of fonts. It is ultimately up to you to decide, but I recommend going for fonts that you won't mind looking at for a long amount of time, because you will. To install them in Windows, just right click on them and install.

Installing basic add-ons
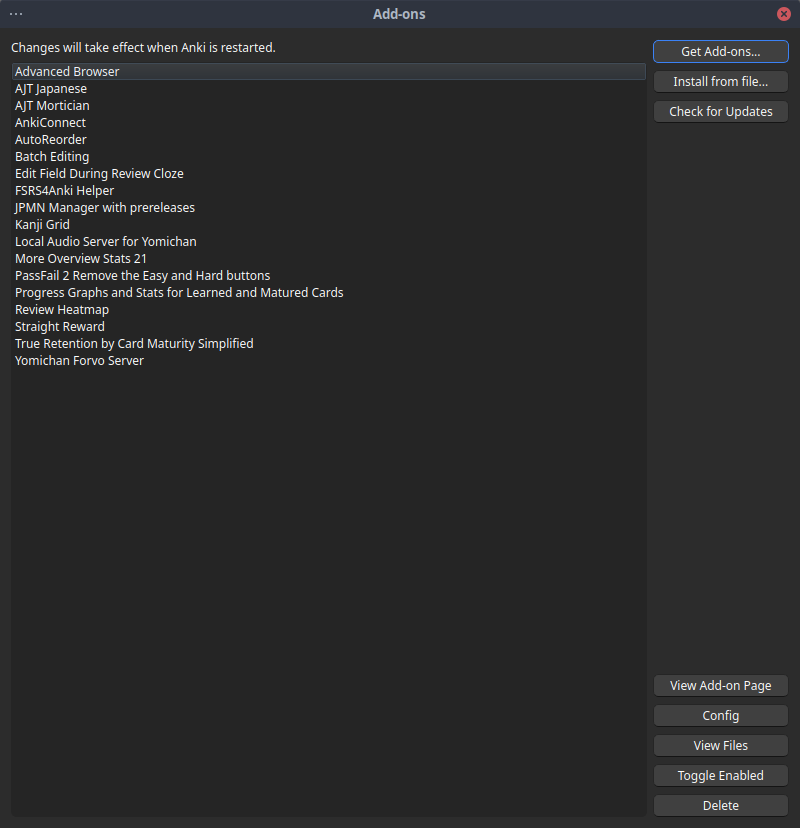
Download all the add-ons I have here. To do this, go in Anki > Tools and then View Files on the bottom left. This opens a folder. Unzip the add-ons above and drop them all in this folder. If you just want to see a visual list of all add-ons I have, scroll down.

Anki is customizable in two ways: The first one is the settings menu that can be found in the app itself, the second one is additional plug-ins (usually called add-ons) that you can find on Anki's add-on page. The first issue with vanilla Anki is the "ease problem" discussed in here. The problem arises when one misses a card repeatedly which lowers the ease factor on that card. Concretely, this means that you will see the card more and more, and on vanilla Anki, the only way to push the ease factor back up is to press "Easy". But it is not clear why this distinction is meaningful, and it is not clear either what "Hard", "Good" or "Easy" represent when learning a language. We are going to sidestep the problem entirely by changing the way Anki deals with ease. To do this, we are going to use the following two add-ons:

General add-ons

These add-ons are useful for everyone and every deck.

Advanced Browser

As the name implies, this gives the browser featured more functionalities.

AutoReorder

AutoReorder is an add-on that lets you re-order your new cards based on a frequency field. It will be used in conjunction with Marv's frequency sorter to allow one to use frequency dictionaries to mine effectively and have the most frequent new words come up first.

Batch Editing

Batch Editing lets you edit entire batches of cards at once. This is very useful when you want to add something to every card in your deck in one go, for instance a picture.

Edit Field During Review (Cloze)

Edit Field During Review lets you edit a card as you're reviewing it.

More Overview Stats 2.1

More Overview Stats 2.1 gives you more stats to the deck overview.

Pass/Fail

This add-on is optional. It removes the "Hard" and "Easy" buttons entirely, which is more of a matter of taste. Personally, I use it.

Progress Graphs

Adds cool progress graphs to help you understand your Anki usage better.

Review Heatmap

Review Heatmap lets you see your progress on the main page of Anki by showing you what days you did Anki and how many reviews you did.

Straight Reward

The add-on makes it so that hitting "Hard", "Good" or "Easy" is considered a success, and chaining together successes increases the ease factor, thus making you see the card less often (since you keep getting it right, you don't need to see it as much). This makes it easy to fix a bad day where you hit again on the same card multiple times. If you are using FSRS (see below), this has no effect and is not needed.

True Retention by Card Maturity Simplified

This add-on gives you accurate information about your retention on mature and young cards.

Japanese-specific add-ons

These add-ons are directly related to Japanese learning and have no direct use for anything else.

AJT Japanese

AJT Japanese will be used to generate furigana readings on words later on when we get to mining. Furigana is basically the spelling of kanji you can write on the kanji to explain to someone who has never read that kanji how to read it.

AJT Mortician

AJT Mortician is used to deal with cards that you fail consistently during the same review session. This usually indicates that the card is giving you particular trouble, and it might be worth spending some time on it outside of Anki (or in a custom study session) to memorize it. Don't forget to check "Count from Daystart."

AnkiConnect

This is by far the most important add-on for mining. It allows one to use Yomichan to create cards automatically, more on this in the mining section below.

JPMN Manager (with prereleases)

This add-on will be useful in managing our mining deck. If you are not going to follow my mining deck setup, this add-on is irrelevant to you.

Kanji Grid

Kanji Grid is a pretty old but reliable add-on that lets you create a grid of kanji, ranking them based on how well you know them. It is not strictly necessary, but seeing the grid fill up as you learn new kanji is uniquely satisfying.

Yomichan Forvo Server + Local Audio Server for Yomichan

Lastly, Yomichan Forvo Server and Local Audio Server for Yomichan are used to add custom audio from Forvo to Yomichan on your local machine, letting you access audio almost instantaneously and fixing some of the issues with the original audio files in Yomichan (usually coming from JapanesePod101, which has some errors). Simply follow the steps listed on this page to get it up and working.

add-ons

The add-ons I use

On the topic of FSRS

FSRS4Anki is a new custom scheduler for Anki that makes use of modern algorithms to enhance your review experience. It is supposed to reduce your total number of reviews while keeping your retention stable. It is also able to do load balancing, which for instance can let you take weekends off if you'd like to do that. I personally suggest all users at least try using this tool after a few months of normal Anki. You can find it on this GitHub page with a guide explaining how to use it. FSRS will reschedule cards for you based on your review history. I suggest users start using FSRS after a month or two of reviews on their mining deck. Once that is done, they can use the optimizer found here to get personalized data to optimize their reviewing experience.

I suggest you follow this FSRS guide. Don't forget to install the corresponding add-on. If you would like to know what the algorithm is about, and how things work, you can read the original paper here. If you would just like to know what the parameters mean, read this. If you decide that FSRS4Anki is not for you, simply take out the custom code from your deck options and delete the add-on.

The guide is already very detailed but here's a simple, bird's eye view of the process of optimizing FSRS. The basic idea is that you export your Anki reviews, upload them to the optimizer and run the code that analyzes your reviews and returns a set of parameters that you put into the custom code in your Anki deck options. Here's a simple flowchart showing each steps you need to take to use FSRS.

FSRS

Anki setup checklist

  1. Install Anki.
  2. Change the settings.
  3. Install fonts.
  4. Install add-ons.
  5. Optionally, install FSRS.

Yomichan Setup

Now that we have Anki set up, it is time to focus on the second crucial tool we will use to learn Japanese: Yomichan. Yomichan is a browser plugin you can use in Firefox or Google Chrome to use Japanese dictionaries while browsing the Internet. This means that you can look up words on the fly simply by hovering over them and pressing a certain keybinding (or none at all). Sadly, Yomichan is now outdated and needs a new fork. Until a fork has emerged as the successor to Yomichan, I recommend using Yomibaba, a temporary fork made to avoid an annoying bug on Firefox.

Installing Yomibaba (Yomichan)

To install Yomibaba, go to the releases page and grab either the Firefox signed extension or the Chrome extension under Assets. Once it is installed a guide should be presented to you. Please read it to see how Yomichan works.

Adding Dictionaries

Yomichan requires third-party dictionaries to function. I recommend getting Shoui's dictionaries from The Moe Way. Don't forget to add monolingual (Japanese-Japanese) dictionaries, you will need them later on. To install the dictionaries, go to Dictionaries > Configure installed and enabled dictionaries... > Import.

Dictionaries

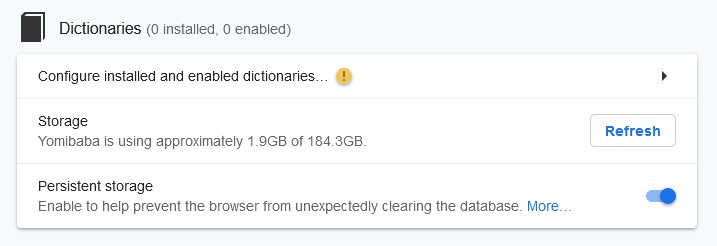
The dictionaries will take a bit of time to import, it is normal.

Install dictionaries in the order given here!

We are going to use the following dictionaries.

Japanese-English dictionaries

We are going to use two dictionaries here. The first one is a normal Japanese-English dictionary that has different forms, synonyms and antonyms as well as example sentences. The second one has examples for different meanings of the word as well as example sentences.

JMdict (extra with examples)
斎藤和英大
Grammar dictionaries

These dictionaries help us noticing and understanding grammar patterns.

Dictionary of Japanese Grammar
日本語教師
Japanese-Japanese dictionaries

These dictionaries are monolingual, Japanese-Japanese dictionaries.

三省堂 8th Ed
新明解 8th Ed
大辞林 4th Ed
旺文社 11th Ed
デジタル大辞泉
明鏡 2nd Ed
Specialty J-J dictionaries

These dictionaries are also Japanese-Japanese but they focus on a specific topic. The first one is for common expressions, the second for classical Japanese and the third for dialects.

使い方の分かる
実用日本語表現v2
Weblio古語辞典
全国方言辞典
漢字ペディア同訓異義
Pixiv Light
Kanji dictionaries

These dictionaries will help us understand kanji, giving us most common words for a specific kanji and so on.

Kanjidic
JPDB Kanji
Kanji Jitenon
Wiktionary
Pitch accent dictionaries

These dictionaries give us pitch accent information.

アクセント辞典v2
NHK2016
Frequency dictionaries

Lastly, these dictionaries give us frequency informations for various words. This will be useful to rank new words by frequency.

Wikipedia Kanji Frequency
JPDB Frequency
Narou Frequency
Novels Frequency
VN Frequency
Anime & J-drama Frequency
Wikipedia Frequency
BCCWJ
CC100
IR
Other possible dictionaries

These will be all the dictionaries we will use, however you can see other interesting dictionaries in this repo. Most notably, if you speak German there is a Japanese-German section thanks to Julian. I suggest using the German version of JMDict. Another place to look for dictionaries is shoui's collection.

Configuring Yomichan

You can simply get my settings file here. To import it, go under Backup and Import Settings. I can not guarantee the rest of the setup works if you do not do this, because some important things require different settings in Yomichan, notably the mining portion of the guide.

Now that we have added dictionaries, we are going to change a few settings to make things smoother for us. As I have said before, I suggest you take some time to read the startup usage guide and see how Yomichan works for yourself. After this, you can disable it showing up every time you open your browser by ticking off Show usage guide on startup in the Yomichan settings menu (press on the cog wheel) under General. The following settings are there if you would rather make your own setup instead of importing mine.

Scanning

Not much to do here, you can change the default modifier key from Shift to something else if you'd rather. You can also choose No key, which automatically looks up any Japanese it comes across for you without having you press any button. It can make looking up a specific word in a sea of Japanese words a bit tedious, but it also doesn't require you to press Shift all the time. You're free to choose whichever option you prefer, I use No key.

Here I suggest to use Allow scanning popup content, as it will be tremendously useful once we start using J-J dictionaries. You also might want to change the number in Maximum number of child popups to something higher, like 5.

Audio

You can adjust the volume audio if it is too loud for you. You can also add auto-play which immediately plays the audio of any word you look up. This is useful when using J-J dictionaries, but I personally don't use it. I highly suggest you set up a local audio server for Yomichan following this guide if you haven't already done so.

Yomichan setup checklist

  1. Install Yomibaba.
  2. Add dictionaries.
  3. Import my settings.

Mining

If you did everything right in the previous section, you should be able to look up words in Japanese with Yomichan. This section will cover everything you need to know to setup a proper mining experience. Mining is usually something one does after going through a vocabulary deck like Core2.3k, but some people start a mining deck halfway through Core and there's nothing wrong with that. It is up to you, I recommend going through Core first as it doesn't really take too much time in the grand scheme of things. You can and should start immersing in native content from day one, but it'll make more sense after you've memorized some vocabulary. Here are a few remarks before we go on to build our mining deck.

Setting up Anki and Yomichan for mining

In this section, we discuss various Anki card notes, install one and setup Yomichan.

Choosing a note type

There are multiple note types available to Japanese learners. The most popular ones are listed on Aquafina's alternatives list. We are going to use Aquafina's jp-mining note. To install it, start by reading the preface. Then, follow the instructions here and make sure you set up Yomichan accordingly. Everytime you're done with mining for the day, remember to use the AutoReorder add-on to re-order your cards based on frequency. It can also do that automatically on startup which is easier. To make sure it is working, open the config file of the add-on and make sure that the name of the field you are trying to re-order from is "FrequencySort", provided you are using Aquafina's mining note as well. If you are not, simply use the name of your frequency field, whatever it is.

If you are using my Yomibaba settings, you already should have the Marv frequency sorting tool as well as the right handlebars working correctly.

Installing Aquafina's mining note

In this section, we actually build the mining note we will be using. I am assuming you have imported my Yomichan settings. If you do not want to for some reason, then you will need to fix the handlebars yourself. Once you have, first make sure you have JPMN Manager installed. Once this is done, go into Anki > Tools > JPMN Manager > Install jp-mining.

Installing jp-mining

Installing the mining deck

After this is done, go into your Anki2 folder on your computer. If you're running Windows, it is in %appdata%. To find it, simply open the Windows searchbar, write %appdata% and then hit Enter. You will find a folder called Anki2. In it, there is a folder with your profile name. Open it, and then open the collection.media folder. It is quite large so it might take a second. After this, search for a file called _jpmn-options.js and open it with a text editor of your choice (like notepad). I suggest you take out the // on both "autoPitchAccent.coloredPitchAccent.enable" and "imgStylizer.mainImage.blur.enabled". You can then save and close the file. It should look like this:

jpmn-options

The deck runtime options

Once this is done, you can try mining a word by enabling Yomibaba on your browser, putting your cursor on a word and clicking on the large (not the small) green button. For instance, try to mine a word from the following sentence: 千里の道も一歩から. If everything worked well, you should have a new card in your JPMN-examples deck. It should be a click card, with the sentence above. If you hover over the sentence, it should show you furigana for the words with kanji. It should also have a definition in English on the front, as well as other definitions underneath it. Lastly, it should have color-coded pitch accent.

There is currently a bug with AJT Japanese that makes generating the furigana break the note slightly, which results in a unflattened childnode error. Sadly there is nothing we can do but wait for a fix somewhere.

Since the construction of the mining note is pretty complex, here is a flowchart to make sure we've done everything correctly. Again, this assumes you are using my settings!

Mining note

The mining deck installation flowchart

Using Marv's frequency sorting tool

If you have imported my Yomichan settings, you don't need to change anything in Yomichan, but you do need to change your deck name to Mining. If you do not call it exactly Mining, the frequency tool won't work. If for some reason you would like to call it anything else, then you need to go to Tools > Add-ons and then double click on AutoReorder. It should open a config file and you can change the name of the deck (which by default is Mining if you imported my add-ons directly) to whatever you want to call it.

Autoreorder

Configuring frequency mining

On the choice of your immersion materials

There are many different kinds of native content you can use for immersion. Here are a few popular ones: visual novels, (light) novels, (YouTube) videos, Japanese TV, podcasts, music, video games. The best one will be the one you don't mind spending lots of time on. I suggest picking up two at the very least: a reading-based one and a listening-based one. Of all the choices above, my favorite for a beginner is by far visual novels.

The reason I prefer visual novels over basically any other kind of medium is due to how complete it is: you get a picture, a complete sentence and voiced audio (usually) at the same time, so it's nice to look at, you are reading and listening at the same time and the progress is easy to track due to the game nature of a visual novel (usually abbreviated VN). One caveat is that most visual novels are for adults due to varying amounts of sexual content in them. Some very popular visual novels have none, and there are all-ages version as well. Overall, visual novels are fun, exciting and great for immersion.

This is not to say that other reading materials are bad however, quite the opposite in fact. Ideally, you would expose yourself to a wide variety of Japanese reading, from visual novels to Wikipedia articles to classics and newspaper articles. But if you are going to choose only one thing for your reading needs, I'd make it visual novels (provided you like them). Remember, the most important part is interest, otherwise it will be extremely hard to make reading a habit. That being said, do remember that most visual novels will require you to run them with a Japanese locale. You can use Locale Emulator to avoid changing your system settings or you can create shortcuts with this tool. Either way, let's move on.

Visual novel setup

In this section, we get all the tools we need to mine from visual novels.

Textractor

The first step is to get a texthooker. A texthooker is a tool that lets you hook the gametext into your browser to let you use Yomichan on it to mine. The recommended texthooker nowadays is Textractor.

Textractor

Textractor

You can download it here. Just get the latest version and run the .exe file. Next, open Textractor and go to Extensions. If you don't see Textractor-Sender, download it from here and add the .xdll file to your extensions by right-clicking on the list.

Extensions

Getting the right extensions

Once this is done, we can now hook the text. To do this, start by selecting a process on the top left and look for your visual novel.

Process

Selecting a process

Once this is done, simply click on your visual novel to go to the next frame. Then you click on the upper bar (where console is written) and you cycle through the options until you find one that has the text on that line in the visual novel, and nothing else.

TexMining

Hooking your visual novel

exSTATic

Next, we need to choose a way to get the hooked text into your browser. There are two ways to do this: clipboard inserters and websockets. The second option is cleaner and generally less error-prone. We are going to use exSTATic which you should be able to find in your browser extensions page. Otherwise, you can follow the instructions here. Once you have installed the browser extension, you should open the tracker page and I suggest you bookmark it because this is where you will be doing your mining.

exSTATic

The exSTATic tracker page

ShareX

Finally, we need to get a tool to extract the picture and (if any) the audio of the sentence you're mining from. This tool is ShareX. First, start by importing my settings. To do this, go in Application Settings on the left (notice the theme might be different):

AppSettings

After this is done, go into Settings and then Import... and use my settings file:

Importing

Importing my ShareX settings

After this is done, if you go back to the main menu you should be greeted with the following:

ShareX

The ShareX homepage

If you want a different theme (I use the Dark theme for instance), you can go into Application Settings and then Theme:

Theme

Changing the theme in ShareX

Now, let's go back to the left and click on Hotkey settings. This brings up the following menu:

hotkeys

The hotkey settings menu

This has four options. The first one is Audio (Anki), which lets us record some audio and have it be sent directly to the collection.media folder. This means that if you mine a card and you record some audio right afterwards, it'll send what you recorded in the audio field of the mining deck. This is useful if you want to record a voiced line in your visual novel for instance. The second option is for a snipping screenshot which is useful when reading manga. The last two options are what we want for visual novels. The third option captures the picture from the visual novel and puts it in the field of the new card. The fourth option does the same, but also blurs the picture, provided you are using my Yomichan settings.

Sadly, if you try to record audio or take a screenshot right now, it will fail for two reasons:

  1. The collection.media folder is not the same for you and me.
  2. We have no tool to record audio.

Let us start with the first issue. Start by clicking on the wheel next to each option of the options above: Audio, screenshot, etc. This opens up the following menu:

Media folder

Changing the media folder path

Notice the blurred parts in the bottom (it shouldn't be blurred on your end). This is my collection.media folder path. You need to change it to yours. The first part is your Windows username, the second is your Anki profile name. You can also type %appdata% in the Windows search bar, press Enter and find your collection.media folder path directly that way. Either way, rewrite the path for each of the four options. It should look like this:

Path

Fixed collection.media folder path

This fixes the first issue. To fix the second, click on the cog wheel next to the Audio option in the Hotkey settings. Next, go to Screen recorder:

Recorder

Screen recorder options

Next, open up Screen recording options... and click on Install recorder devices. Once this is done, check that Video Source: is set to None and Audio Source: is set to virtual-audio-capturer:

recording-options

Screen recording options

You can now quit this screen and you should have a functional ShareX setup. If you have a mouse with external buttons, I highly recommend using Xelieu's one-click script. To use it, install AutoHotKey. Once you want to use it, simply open up AutoHotKey and launch the script above (double-click on it). This allows you to use the Screenshot and Audio shortcuts with your mouse. On my mouse, the upper most button does Screenshot (VN) and the lowermost button does Audio (Anki).

Mining recap

To mine, we now open up our visual novel, Textractor, the exSTATic tracker page and ShareX. Follow the steps in the Textractor section to get the text hooked on the exSTATic tracker page, and use Yomichan to mine words by clicking on the big green button in the pop-up window. Once this is done, take a screenshot of the visual novel with either Shift+Alt+C or your mouse button if using Xelieu's hotkeys. If the line is voiced and don't mind spending the time to grab the audio, record the audio with either Shift+Alt+A or the other mouse button. Congratulations, you have mined a word from your visual novel!

Other setups

Here is a quick list of a few other mining setups that are available.

Manga setup

To mine from manga, you will need some kind of OCR tool. The best one we have so far is by far mokuro. If you do not want to install it (or you can't), you can check the list of manga that has already gone through mokuro here. Then you can simply use Yomichan on the text bubbles and mine that way. I also suggest using ShareX to grab pictures of the volume you're reading with the snipping feature.

Novel setup

To mine from (light) novels, I suggest using ッツReader. Simply upload an HTML/EPUB and start reading. You can read about it here and I highly suggest at least browsing the Usage tab. If you would like to have pictures in your cards, I suggest adding the various pictures in the light novels you're reading to your cards. You can use batch editing to add a picture to many cards at the same time or simply the novel cover.

Listening setup

If you have a video with subs and you would like to mine from it, I suggest using asbplayer. The docs are here.